
If you’re looking for a guide that walks you through how to start a podcast, you’re absolutely in the right place…
Starting a podcast isn’t difficult, but there are a number of steps you’ll need to go through in order to get it launched.
In this podcasting tutorial, we’ll walk you through every step of the process:
- Choosing a topic & name
- Show and episode format
- Cover art creation
- Intro & outro music
- Equipment selection
- Audio recording & editing
- Submission to Apple Podcasts (iTunes)
- Promotion tips
And much more…
Bonus: Free 10-Day “How To Start A Podcast” Email Course
Just click the link and enter your email to get the first lesson:
Click Here To Get The Free “How To Start A Podcast” Email Course
Just a few of the things you’ll learn:
- What to podcast about
- Equipment you’ll need
- How to record & edit
- How to promote your podcast
Get started today!
Podcasting is a much less crowded and competitive space than blogging, making now the perfect time to get started.
As of July 2026, there are just over 2 million podcasts, but over 600 million blogs!
In case you’re wondering, I’ve helped thousands of people start a podcast in the last several years and have started a few shows in different industries myself.
Looking to start a podcast quickly? Sign up with Buzzsprout, upload your audio files, and submit to Apple & Spotify.
Let’s get started:
Planning
This is the initial (often overlooked) stage to make a podcast. You’ll want to spend a good amount of time here before you move on.
Feel free to get out a notebook or a whiteboard so you can start planning your podcast like a pro.
Choose A Topic
You want your podcast to be focused on a particular topic or niche.
Try to narrow it down to something you can speak about for many episodes (100+) but that isn’t so broad that you won’t appeal to your potential audience.
For example, instead of having an “outdoor” podcast, talk about hiking – or even more specific, like hiking 14ers.
You can always expand your topic later as you get more popular.
Important: see the section about choosing a name to make sure you don’t limit yourself.
Pick A Co-host (optional)
Do you have a friend, business partner, or coworker that you want to co-host with?
It can be much easier to start podcasting if you have a co-host.
You will naturally have a more engaging conversation if you both share your points of view on a topic. It can also be helpful to have someone to keep things on track.
Plus, you can split additional tasks of editing, promoting, and more.
There can be downsides though.
You’ll want to make sure both of you are committed to it for the long term. And it helps to set a schedule from the beginning so you know when you will be recording every week.
There aren’t rules here though. If your co-host drops off, you could still continue the podcast without them. Or you could start solo and add a co-host later.
The important thing is to just get started.. so let’s choose a name:
Choose A Name
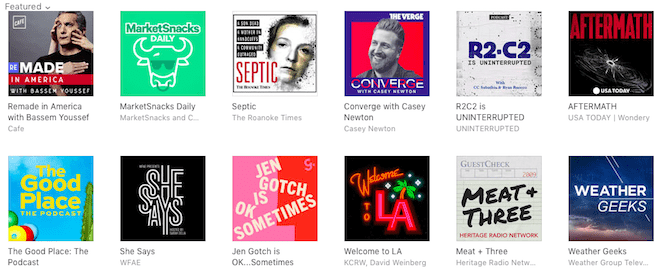
If you look at the top Apple Podcasts charts, you’ll see a variety of different names.
Some are descriptive of what the show is about, while others don’t mean much.
I’m actually going to seemingly contradict what I said earlier: You want to choose a name that is broader than your topic.
Using the hiking example earlier, if we choose “The 14er Cast” as our name, what happens when we want to talk about backpacking & ultralight camping too?
Instead, choose a name that will let you expand if you decide to later. Maybe “Mountain Adventures (Above & Below 14K ft)” would work as it gives a hint to hiking 14ers but gives you the option to talk about all kinds of stuff if you want.
I just came up with that as I was writing this, I’m sure you could do better!
Action Step: Purchase a domain name (opens in a new tab) for your podcast.
Another option is to get a free domain name with a Bluehost web hosting plan. You can search right here on this page – try it out!
I also have some more tips on choosing a domain name here if you want.
Show Format
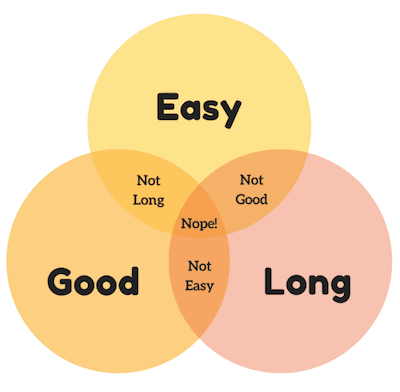
Length
You’ll find a number of “experts” claim that certain lengths are perfect for podcasts. The problem is that’s just BS.
You don’t need a 28-minute podcast because that’s the average driving time. Or under an hour because people can’t pay attention longer than that.
There are 5 minutes podcasts and there are 6-hour podcasts. Find whatever works for you and run with it!
What I would try to avoid is making it longer than it needs to be because you went off-topic for 15 minutes.
Here’s a great image from Pop Up Podcasting that shows “easy, good, or long – pick two”:
Style
Interview shows are popular, but that doesn’t mean you have to do one.
You can do solo (or co-hosted) shows half the time and interview shows the other half.
One big benefit of doing interviews is that they help a ton with getting new listeners – especially if you make it easy for your guest to share with pre-written templates and graphics.
Episode Format
So what does a specific episode sound like? I wrote this post about podcast intros, but it has a bunch of examples of different episode formats for popular podcasts.
Here’s one example:
- Teaser
- Intro Music
- Welcome
- Ad Spot
- Interview
- Call To Action (“Review us on iTunes!”)
- Outro Music
Get creative with this part.
Different segments make it easier to share small clips on social media too.
But remember that for every episode you put out, you will have both repeat listeners and new listeners so you should try to speak to both of them.
Preparation
Now that you’ve written down your topic, format(s), and secured a domain name, we’ll need to get a few things prepared ahead of launch…
Create Cover Art
Your cover art is the first impression most people will see as they browse through Apple Podcasts or their favorite podcast app.
It’s might also be the image someone sees when you share your show on social media.
Buzzsprout has written an excellent article about designing cover art, so I would definitely start there.
If you have a little bit of a budget, I highly recommend 99 Designs to get yours created.
You’ll get hundreds of different designers to produce a draft – then you can choose the ones you like to have them further refined.
Get A Professional Intro (Optional)
Music Radio Creative is the best place to get professional-quality voiceovers and intros.
Having a third-party introduce you just takes your perceived value up a notch, which is a great way to stand out when first starting a podcast.
Choose Intro Music
I’m a big fan of PremiumBeat for podcast music.
It’s easy to search, you get a full license, and they have a bunch of different styles.
Take a look at this post on royalty-free music for more options.
Most people don’t need an unlimited subscription-style music service – just a song or two.
Get A Microphone
Audio quality is important but it doesn’t have to cost a ton to get a good quality microphone for podcasting. One of the most popular podcasting microphones is the Audio-Technica ATR2100x-USB.
It’s both a USB microphone and has an XLR connection which lets you upgrade your recording equipment without needing a new mic.
I recommend taking a look at our podcast starter kit post for more options here, especially if you plan on having a co-host or two.
Podcast Guests
If you are doing an interview show, now is the time to get a list together of who you want on your podcast.
Then start reaching out to them.
It can help to use a service like Acuity Scheduling so people can book right on your calendar when it’s convenient for you.
This saves the headache of going back and forth working out a meeting time – and means you can focus on getting more guests!
Plus you can ask them for certain info like their Skype username or an intro you can read when they schedule with you.
To record your interviews when you’re not in-person (or if your co-host doesn’t record in the same room with you) I use and recommend Iris.
Recording & Editing
Alitu (The Easy Way)
If you haven’t used editing software before, even simple actions in GarageBand or Audacity can be quite intimidating.
It’s understandable: audio production is completely full of jargon!
If that’s the case, then Alitu might be the way to go.
It’s a ‘podcast making’ tool that automates a lot of the confusing technical parts, and practically builds your episode for you. It’s all based right inside your browser, so no software to download, and it works on any computer connected to the internet.
It is built to be super simple to use and does pretty much everything:
- Takes care of audio cleanup
- Lets you add music
- Helps you piece together your audio segments
- Has direct publishing of your episodes.
All you need to do is upload your recordings, and use the fool-proof podcast-specific editor to take out any big mistakes. Alitu does the rest!
Even better, Alitu includes a library of music and jingles which you can use as your theme tune, or as transitions between segments.
Whether you’re a complete beginner, or an experienced podcaster looking to drastically cut down on your production time, you should definitely give Alitu a try. It comes with a 7-day free trial, so sign up here and try it out!
GarageBand (Free Option)
I’m going to show you how to use GarageBand for recording and editing.
Other audio editing software is similar but most have more advanced features that you don’t need when getting started. Popular options are Adobe Audition & Audacity (both work with Mac & PC).
You can also check out our full post on podcast editing software.
Create A Template
Before you get started, it will be much easier if you create a template that you can reuse every time you record a podcast episode.
What this means is that you will have your intro & outro music already placed, space for ad spots, as well as your tracks for your voice or an interviewee.
Keep in mind this will look different depending on your episode format – create a podcast template that works for you. Here’s one I use:
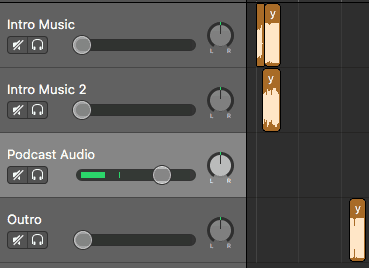
I’ll just open the template up, click File -> Save As, and save the file as my episode name (i.e. 008-episode-8-title).
This will also keep any effects you have applied to the tracks, including compression, EQ, or anything else. I’ll show you the settings I use in the editing section below.
Record Your First Episode (Or 3)
Solo
If you’re just recording a solo episode or want to record an intro to an interview you did, simply select the track you want to record to (see the light gray Podcast Audio track selected above) and click the red Record button up top:

Multiple Hosts
If you have multiple hosts, you’ll need to click Track -> Configure Track Header and check Record Enable.
This will give you the option to enable multiple tracks to record at once and you’ll see the Record Enable button on each track:
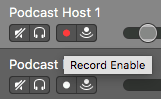
You’ll click that button on each track you want to record, then click the big record button up top. Easy enough!
Remote Interview
Many people use Skype for recording remote interviews and the easiest way to actually record the audio (or video) is with Ecamm Call Recorder For Skype (Mac only) or Pamela (for Windows).
If you want better audio quality than Skype or Zoom allow, or a way to have individual audio files for more than 2 people, services like Iris are excellent. They are designed for remote recording and podcast interviews.
When you are done recording, you’ll have two separate tracks that you will place on top of each other like this:
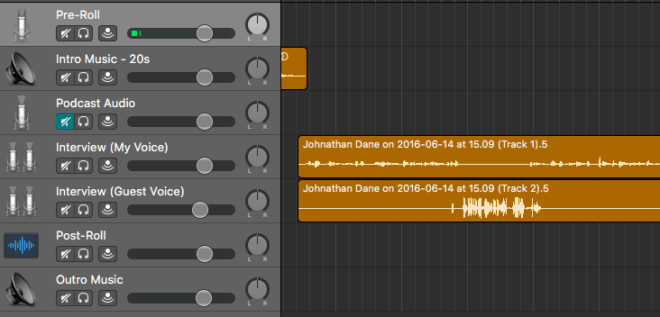
This also shows another template that you may want to use. The Podcast Audio track is only used for solo shows, and the Interview tracks are only used for interview shows.
Edit Your Episode
There are a couple of things you can easily set up once (and save in your template) that will make your podcast (and your voice) sound much better.
Keep in mind that everyone’s voice is different so there aren’t perfectly universal settings, but these may give you a good starting point:
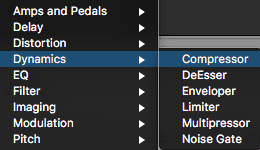
- Select the track you want to work with (start with your voice)
- Click an empty space in the Plug-ins box
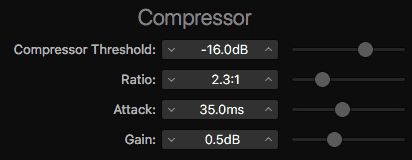
- Add compression by going to Dynamics -> Compressor:

- I use these settings (sometimes I’ll add more gain):

- Next we’re going to add EQ (under EQ -> Channel EQ).
- Here are my settings:


- 100 Hz: 24dB/Oct roll off, Q: 0.79
- 160 Hz: -2.5dB, Q: 2.20
- 500 Hz: -1.0dB, Q: 0.71
- 930 Hz: -0.5dB, Q: 3.20
- 3400 Hz: +0.5dB, Q: 0.71
- 5400 Hz: +2.5dB, Q: 0.71
I’m not going to get into what all that means, but if you just do one, the low-end roll-off (on the left) will be a good start.
Or you can just download my Podcast Vocal EQ settings here (.pst file on Dropbox).
The last step I’d recommend is going to Auphonic to apply some normalization for loudness (LUFS), leveling, and filtering. It will also automatically add ID3 tags should you need them.
Launch!
Get A Podcast Host
I use and highly recommend Buzzsprout podcast hosting after trying many different companies over the years.
Plus you’ll get a free $20 Amazon gift card after you sign up for a paid plan!
Feel free to check out our complete podcast hosting guide if you want to see other options, but another great choice for larger brands is Transistor.
You can also look at this list of the best podcast platforms.
Once you’ve signed up, you’ll need to fill out some required information about your podcast (name, description, categories, etc.).
Upload Your First Episode
If you use Buzzsprout, this process is super simple.
If not, it’s possible you need to mess with things like embedding ID3 tags into your MP3. Sounds confusing and unnecessary – let’s not do that.
You’ll just need to click the “Upload” button:
and they’ll apply some magic processing to your mp3 file.
Then you’ll need to fill out the episode title, description, summary, publish date, and episode #.
If you want to use Seasons, put a “1” there, otherwise leave it blank. If you use a lot of bad words, click the explicit checkbox.
It can be helpful to create a template for your episode description (in a separate text document) to reuse for every episode – I use something like this:
Click save and repeat this step for your initial release of episodes.
It’s recommended to launch a podcast with more than 1 episode so that people don’t have to wait to hear more.
3 to 5 episodes is a good number to start with.
Submit To Apple Podcasts (iTunes)
I have a separate guide on how to submit your podcast to iTunes but within Buzzsprout just click Apple Podcasts under the Directories tab and follow the steps they’ve put together.
After that, grab your podcast RSS feed and submit it to other podcast directories too.
As you upload new episodes, your host will automatically update your RSS feed and any podcast directory you’re listed on will also update with your new episode.
Spread The Word
Use Buzzsprout’s social sharing feature to generate teaser videos and start sharing!
There are other companies that will help you generate different styles of audiograms, but having it built into your host makes it really easy to create (and it won’t cost you extra).
Wavve and Headliner are two excellent choices if you want to create more custom podcast videos to share.
Check out this article on podcast promotion to for a bunch of other marketing tactics. One of the most impactful ones is building your own website (see next step below).
Recommended Steps (After Starting A Podcast)
Your job isn’t done once you start a podcast. Here are my recommendations to help make your show more appealing and easier to grow:
Create A Website
WordPress (Easy To Medium Difficulty)
Podcast hosting companies usually give you a website, but if you want to be taken seriously get yourself a separate WordPress host.
For beginners, Bluehost is easily the best option (plus you’ll get a free domain name for the first year).
If you need a bit more guidance, start with this how to start a WordPress blog post for the initial steps.
I have a list of excellent WordPress plugins that a podcaster would need too.
And if you need more help, I have a course called Podcast Website LaunchPad that walks you through everything.
Podcastpage (Easiest Method)
Podcastpage is a website builder and hosting all-in-one made specifically for podcasts. Kind of like Wix but designed for the needs podcasters.
No coding is necessary. You just choose one of their themes, customize to your liking, and optionally integrate email marketing or Google Analytics.
You can add pages or blog posts, customize your audio player, and make it easy for your visitors to subscribe!
It works with any podcast hosting provider and pricing is fair, starting at $80/year or $8/month.
Check it out and sign up for a free trial here.
Get Transcriptions
Transcriptions are an excellent way for search engines (like Google) to “read” your podcast episodes. They also give your audience another way to look something up quickly.
You don’t have to start out with them, but it’s another one of those things that will set you apart.
Buzzsprout has a built-in transcription service (on paid plans) that costs $.10/minute, but my favorite transcription service is Rev – give them a try.
Create Show Notes
Show notes can be transcriptions like above, a simple summary of what you talked about, or a full blog post tailored more toward reading than listening.
Some people do a combination.
On this site, we start with written content first and then create podcast episodes after.
Embed Your Episode
Grab your episode embed code and place it on your show notes page so people can listen from your website.